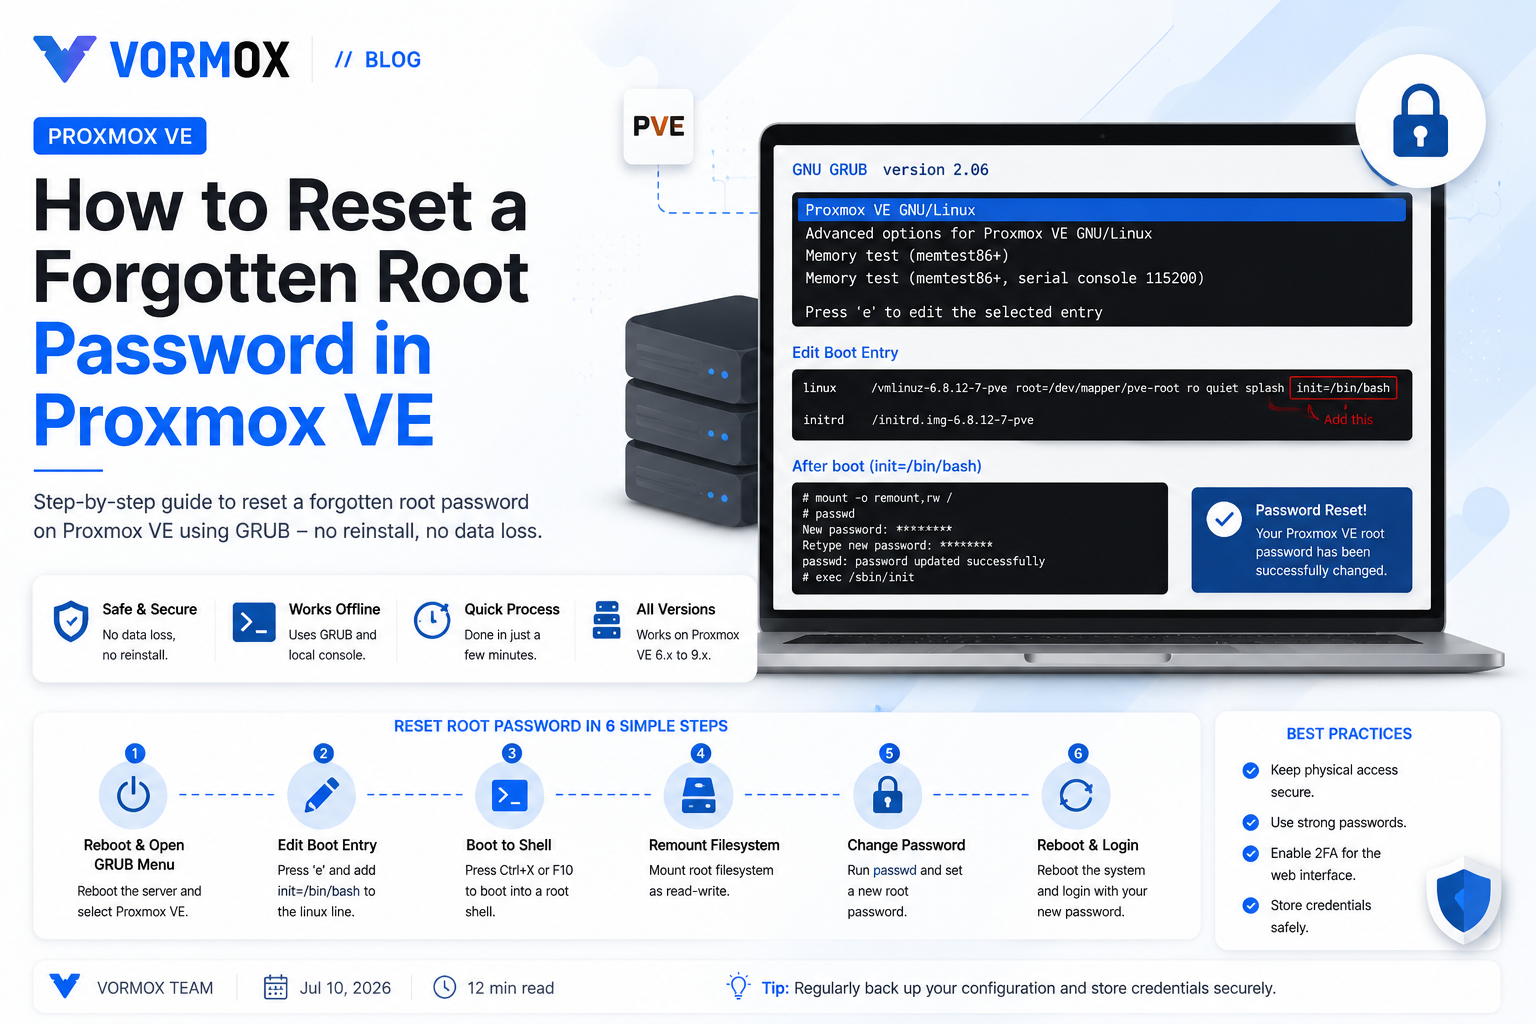
Introduction
You haven't logged into that Proxmox box in eight months, the password is somewhere in a notes app you switched away from, and none of the three guesses you just tried worked. It happens to everyone eventually — a homelab server tucked in a closet doesn't get touched often enough to keep the password fresh in your head. The good news is that as long as you have physical or console access to the machine, a forgotten root password on Proxmox VE is completely recoverable. No reinstall, no data loss, just a few minutes at the boot menu.
This covers Proxmox VE 9.2 and 8.x, both of which use the same GRUB-based recovery approach. The method has been consistent across the 6.x, 7.x, and 8.x series, and nothing about it changed with the move to Debian 13 "Trixie" in version 9.
What You Will Learn
You'll reset a forgotten root password using GRUB's edit mode to drop into a root shell before the login prompt even loads, which is the fastest method and works whenever you have physical or virtual console access to the host. You'll also see the live-CD fallback for the rare case where GRUB itself isn't reachable, plus the separate, much simpler process for resetting the root password inside an LXC container, which is a completely different situation people often confuse with the host-level reset.
What Is This Feature?
What you're actually using here isn't a Proxmox-specific tool — it's a general Linux recovery technique that works because of how the boot process is ordered. Normally, the kernel loads, then systemd (Linux's init system, the first process that starts everything else) brings up services one by one, eventually reaching the login prompt that asks for your password. Password checking is one of those later services.
GRUB, the boot loader that hands control from the BIOS/UEFI firmware to the Linux kernel, lets you edit the exact command passed to the kernel at boot time, just for that one boot. Appending init=/bin/bash to that line tells the kernel to launch a plain bash shell as the very first process instead of the normal systemd startup sequence — before any password check ever runs, before networking comes up, before anything. You land in a root shell with full filesystem access and nothing standing in the way.
It's a powerful shortcut, and it comes with an obvious implication: anyone with physical or console access to a Proxmox box can get in this way, no password required. That's not a flaw in Proxmox, it's true of essentially every Linux system with an unsecured bootloader — physical access has always effectively meant full access, which is exactly why the fix on the other end of this guide is securing that access, not avoiding the technique.
Why Would You Use It?
Forgotten passwords are the everyday reason, especially for a rarely-touched homelab node or a server you inherited from a previous admin who's long gone. Buying used or inherited hardware with Proxmox already installed is another common case — you own the box, but not the credentials someone else set up.
It's also worth knowing before you need it. The first time most people learn this process is during an actual emergency, stressed and Googling from a phone while standing in front of a rack. Reading through it once beforehand means you're executing a plan instead of improvising one when it actually matters.
One thing this is not: a way to recover data or config from a system you don't otherwise have legitimate access to. If you're locked out of hardware that isn't yours — a work server, a colocated box you don't administer — this isn't a shortcut around that; go through whoever actually controls physical or console access to it instead.
Prerequisites
- Physical access to the server, or remote console access through IPMI, iDRAC, iLO, or a hypervisor-provided console if Proxmox itself is running as a nested VM somewhere.
- A keyboard attached to that console — this whole process happens at the boot screen, before any network service is running, so SSH won't help you here.
- Roughly five to ten minutes, most of it spent at the GRUB menu and typing the new password.
- For the live-CD fallback method only: a USB installer or ISO of any Linux live environment, and a way to boot from it on that hardware.
Step-by-Step Tutorial
Step 1: Reboot and Catch the GRUB Menu
Reboot the Proxmox host and watch the screen during boot. You'll briefly see a GRUB menu listing kernel entries — press any key to stop it from auto-booting if it's about to skip past. Highlight the default Proxmox VE entry (don't press Enter yet).
Step 2: Enter Edit Mode and Modify the Boot Line
Press e to edit the highlighted entry. You'll see several lines of boot configuration — find the one starting with linux /vmlinuz-.... Use the arrow keys to move to the end of that specific line.
Type a space, then append:
init=/bin/bashIf you see quiet anywhere on that line, removing it isn't required but it's worth doing — it lets you actually see kernel messages if something doesn't boot the way you expect, rather than staring at a blank screen wondering if it's still working.
Step 3: Boot Into the Recovery Shell
Press Ctrl+X (or F10 on some systems) to boot with the modified line. Instead of the normal login prompt, you'll land directly at a bash root shell — no login, no password, because you skipped the process that would have asked for one.
Step 4: Remount the Root Filesystem as Writable
The filesystem typically mounts read-only at this early stage of boot, since none of the usual startup scripts have run yet. Fix that first:
mount -o remount,rw /Skipping this step is the single most common reason people report passwd failing with a permission or read-only filesystem error immediately after — if that happens, come back here before doing anything else.
Step 5: Set the New Password
passwdRunning passwd with no argument targets the currently logged-in user, which at this point is root, since you booted straight into a root shell. Type the new password, confirm it, and you're done — no confirmation email, no security question, it just takes it. If you need to reset a different local account instead, specify it directly:
passwd usernameStep 6: Reboot Normally
exec /sbin/initOr, if that doesn't cleanly hand off, hold the power button for a hard reset — not elegant, but safe at this stage since your password change was already written to disk the moment passwd completed. Let the system boot normally this time, with no boot-line edits, and log in with the new password through the console or the web GUI.
Alternative: Recovery via Live CD (When GRUB Editing Isn't an Option)
If GRUB is itself password-protected, or you're dealing with an unusual boot setup that makes editing the kernel line impractical, boot the machine from a Linux live USB or ISO instead. Once in the live environment:
mkdir /mnt/pve
mount /dev/sdaX /mnt/pve
passwd -R /mnt/pve
Replace /dev/sdaX with the actual root partition — check with lsblk first if you're not sure which one it is. On a ZFS root install, mounting works differently since ZFS doesn't use traditional partitions the same way:
zpool import -f -R /mnt/pve rpool
passwd -R /mnt/pve
zpool export rpool
The -R flag on passwd tells it to operate against a password database mounted somewhere other than the live system's own root, which is exactly the situation you're in here.
Resetting a Password Inside an LXC Container Instead
This is a genuinely different scenario worth calling out on its own, since it's easy to confuse with resetting the host's password. If it's a container's root password you've lost, not the Proxmox host's, you don't need any of the above — you have host-level access already, so just enter the container directly:
pct enter 100
passwd
Replace 100 with the container's actual ID. This works because the Proxmox host, as the container's parent, always has direct entry regardless of what password is set inside it.
Commands Explained
| Command | What It Does |
|---|---|
init=/bin/bash | A kernel boot parameter that launches bash as the very first process instead of systemd, skipping login and password checks entirely for that boot. |
mount -o remount,rw / | Remounts the already-mounted root filesystem with write access, needed because early boot mounts it read-only by default. |
passwd | Sets a new password for the current user — root, in this context — prompting twice for confirmation. |
passwd -R /mnt/pve | Sets a password against an account database mounted at a specific path rather than the running system's own root, used from a live-CD environment. |
zpool import -f -R /mnt/pve rpool | Imports a ZFS root pool and mounts it under an alternate root path for offline recovery work. |
pct enter <vmid> | Opens a root shell inside a specific LXC container directly from the Proxmox host, bypassing any password set inside the container. |
Common Errors
Run passwd too early and you'll see:
passwd: Authentication token manipulation error
This is almost always the read-only filesystem from Step 4 getting skipped. Run mount -o remount,rw / first, then try passwd again.
If the GRUB menu doesn't appear at all during boot, you'll just watch Proxmox boot straight through to the login prompt with no chance to press e. Some systems set an extremely short GRUB timeout, sometimes effectively zero. Tap a key repeatedly right as the BIOS splash screen clears — you have a fraction of a second on some hardware, and it's worth several attempts before assuming it's genuinely disabled.
On a ZFS-root install, trying to mount the root filesystem like a normal ext4 partition (skipping the zpool import step) typically fails with something like:
mount: unknown filesystem type 'zfs_member'
ZFS doesn't mount through the regular mount command the way ext4 or XFS do — you need zpool import first, as shown in the live-CD method above.
Troubleshooting
If exec /sbin/init in Step 6 hangs or produces errors instead of finishing the boot cleanly, don't panic — the password change already happened and is safely written to disk by that point. A hard power cycle and a normal boot afterward is perfectly safe here; you're not risking the change you just made.
Can't find the linux /vmlinuz-... line to edit in Step 2? On some newer installs using systemd-boot instead of classic GRUB, the interface looks different — you'll typically be able to edit the kernel command line directly rather than hunting through a multi-line boot script. The parameter you're adding, init=/bin/bash, is the same either way.
If none of this works because GRUB itself has a password set that you also don't know, the live-CD method is your fallback, since it bypasses the bootloader entirely by booting a completely separate operating system from external media.
Locked out of a container rather than the host? Don't apply any of the GRUB steps at all — go straight to pct enter <vmid> as shown above. Mixing up these two scenarios is a common source of wasted time; the host-level recovery process is solving a completely different problem than a lost container password.
Best Practices
Set a GRUB bootloader password once you've confirmed everything else works, if physical security of the server itself is a real concern — a locked server room reduces the risk somewhat, but a bootloader password adds a second layer for anyone who does get physical access. Just store that password somewhere you won't also lose, since forgetting a GRUB password is a considerably bigger headache than forgetting the root login.
Use a password manager for infrastructure credentials rather than relying on memory, especially for boxes you don't touch daily. This entire situation exists because passwords for rarely-used systems fade from memory faster than you'd expect.
Set up a non-root administrative user with sudo access as a matter of course, rather than doing everything as root day to day. It's not directly related to password recovery, but it's the kind of habit that limits blast radius if a credential does leak somewhere.
If you manage multiple Proxmox nodes, don't reuse the same root password across all of them. It's tempting for convenience, but it turns one leaked credential into access to your entire fleet instead of just one box.
Frequently Asked Questions
Does this method work if the disk is encrypted?
Not directly — you'll need to unlock the encrypted volume first, which requires the encryption passphrase. A forgotten root password and a forgotten disk encryption passphrase are two separate problems.
Will resetting the root password affect my VMs or containers?
No. Guest VMs and containers keep running through a host reboot for this process, and their own configuration and data are untouched by a host password change.
Can someone do this to my Proxmox server remotely over SSH?
No. This entire process requires console access at the actual boot screen — it cannot be performed over SSH or through the web interface.
Is there a way to prevent this recovery method from working on my own server?
Setting a GRUB password makes it harder, and full-disk encryption makes it harder still, but neither makes physical-access recovery fully impossible — that's inherent to how bootable systems work, not specific to Proxmox.
What if I also forgot my Proxmox web GUI's separate PAM or PVE-realm user passwords?
The root Linux account and Proxmox's own user realm are connected — once you're root at the system level, you can reset any Proxmox-realm user's password through pveum or the web GUI's user management screen.
Does this work the same way on a Proxmox VE node inside a cluster?
Yes, the process is identical on a clustered node. It resets that one node's local root password only and has no effect on the cluster configuration or other nodes.
Conclusion
Six steps and a keyboard at the console is genuinely all it takes, and the whole thing is over before a normal boot would have even finished. The part that catches people off guard isn't the recovery itself — it's forgetting that this same technique means physical access has always been the real security boundary on any Linux box, Proxmox included, which is worth factoring in the next time you're deciding where a server physically lives.
Write the new password down somewhere durable this time, in a password manager or a sealed note in a safe rather than a notes app you'll switch away from — future you will be glad you did.