Introduction
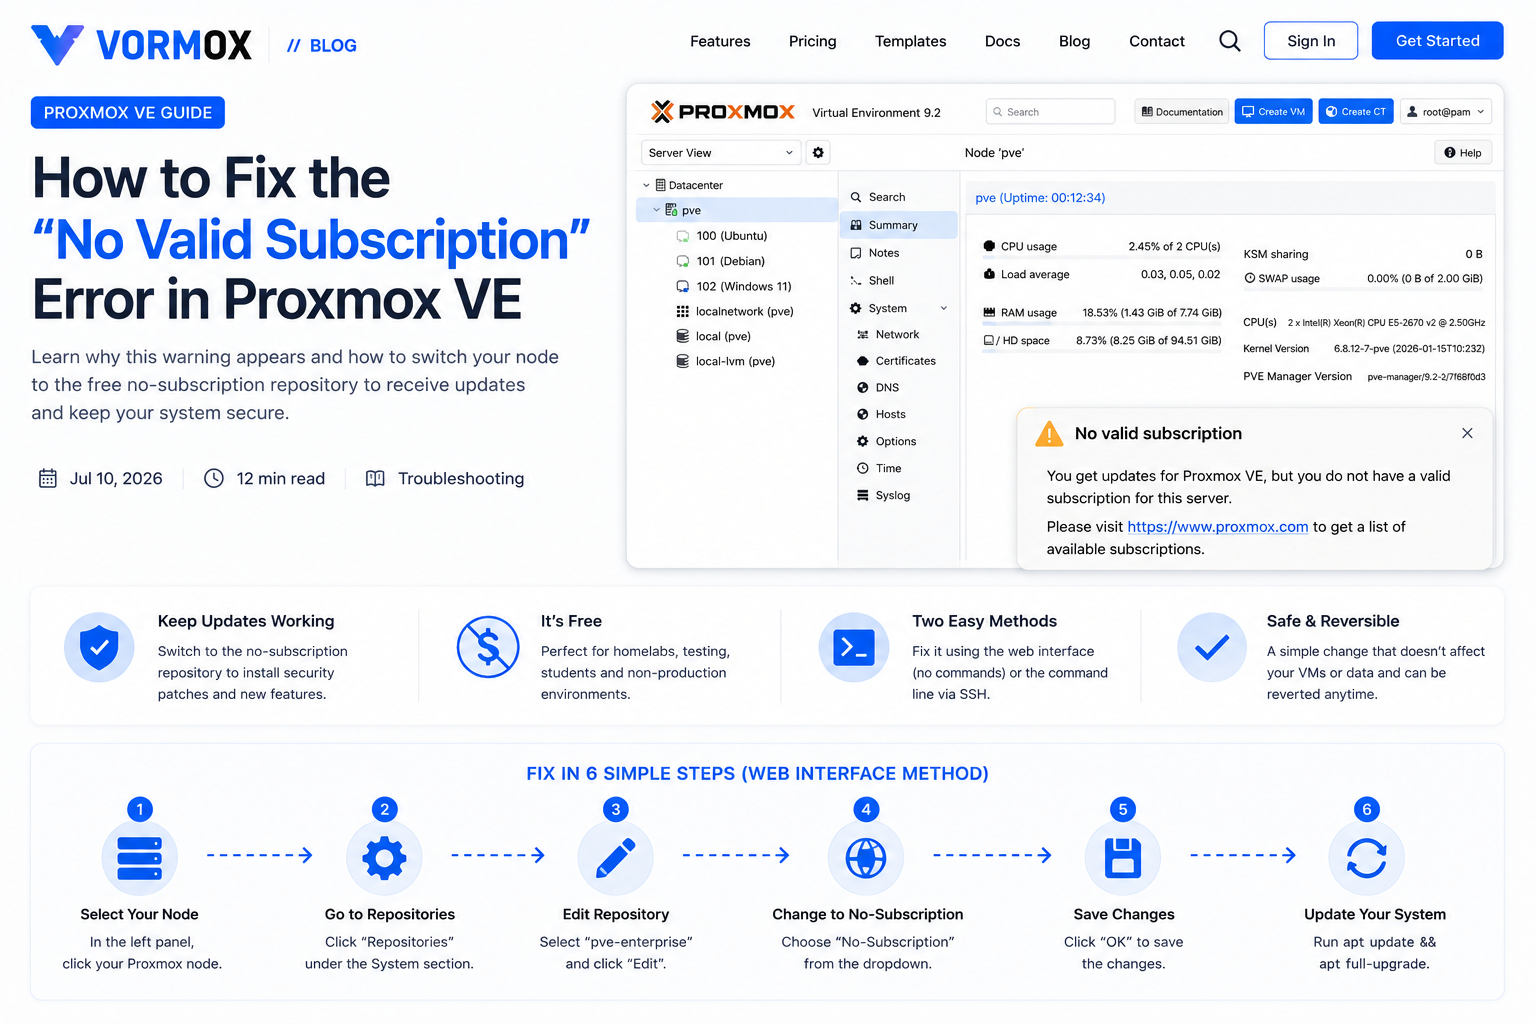
If you just installed Proxmox VE and logged into the web interface for the first time, you may have seen a pop-up window titled "No valid subscription". It usually shows up right after you log in, and it can be a little alarming if you are new to Proxmox.
Here is the good news: this message does not mean anything is broken. It does not mean your virtual machines are in danger, and it does not mean you did something wrong during installation. It simply means your Proxmox VE node is set up to use the paid "enterprise" update channel, but you have not entered a subscription key.
In this guide, we will explain exactly why this warning appears, and we will walk through how to switch your node to the free "no-subscription" update channel so you can install updates and get rid of the pop-up. This is one of the very first things almost every homelab user and small business owner does after installing Proxmox VE, so do not worry, you are not alone.
What You Will Learn
- What the "No valid subscription" message actually means
- The difference between the enterprise repository and the no-subscription repository
- How Proxmox VE package repositories are structured, including the newer file format
- How to fix the warning using the Proxmox web interface (no terminal needed)
- How to fix the warning using the command line, for anyone who prefers SSH
- How to safely run
apt updateafterward without errors - Common mistakes people make when doing this, and how to avoid them
What Is This Feature?
To understand this warning, you first need to understand two things: repositories and subscriptions.
A repository is simply an online storage location that holds software packages. When your Proxmox server checks for updates or installs new software, it does not download files randomly from the internet. Instead, it looks at a list of trusted repositories and pulls packages from there. This is the same system used by Debian and Ubuntu, since Proxmox VE is actually built on top of Debian Linux.
Proxmox VE ships with two main repositories for its own packages:
| Repository | Who It's For | Requires a Paid Key? |
|---|---|---|
| Enterprise repository | Businesses running Proxmox in production with a paid support contract | Yes |
| No-subscription repository | Homelabs, testing, learning, and non-production use | No |
By default, a fresh Proxmox VE installation points to the enterprise repository. If you have not purchased a subscription key, this repository will refuse to give your server updates, and the web interface will remind you about it with that pop-up every time you log in. That reminder is really just a nudge to either buy a subscription or switch to the free channel.
It also helps to know that Proxmox actually sells several different subscription levels, not just one. You do not need to buy anything to follow this guide, but it is useful context for understanding why the warning exists in the first place:
| Subscription Level | Typical Use Case |
|---|---|
| None (No-Subscription repository) | Homelabs, students, testing, learning environments |
| Community | Small deployments and individuals who want a low-cost way to support Proxmox development |
| Basic | Small businesses that want limited official support |
| Standard / Premium | Companies running Proxmox in production that need guaranteed response times from Proxmox support engineers |
Every one of these levels, including having no subscription at all, gives you the exact same Proxmox VE software. The only difference is which repository you pull updates from and whether you have access to official paid support.
Why Would You Use It?
Switching to the no-subscription repository matters for a very practical reason: without doing so, running apt update on your node can fail with an authentication error, which means you cannot install security patches or new features.
You would want to make this change if:
- You are running Proxmox VE at home in a homelab
- You are a student or hobbyist learning virtualization
- You are testing Proxmox before deciding whether to buy a subscription for production use
- You are a small business or developer who does not need Proxmox's paid enterprise support
If you are running Proxmox VE for a company in production and want official support along with the most heavily tested updates, you should instead consider buying a real subscription. This guide focuses on the free path, which is what the vast majority of new users need.
Prerequisites
Before you start, make sure you have the following:
- A working Proxmox VE installation that you can log into, either through the web interface or through a direct console/SSH session
- Root (administrator) access to the server, since editing repository files requires full permissions
- A basic internet connection on the Proxmox host so it can reach the update servers
- About 10 minutes of your time
You do not need any programming experience. If you are comfortable copying and pasting a few commands, or clicking through a settings menu, you can complete this guide.
Step-by-Step Tutorial
There are two ways to fix this: through the graphical web interface, or through the command line. Pick whichever one feels more comfortable. Both achieve the exact same result.
Method 1: Using the Web Interface (Recommended for Beginners)
This method uses clicks instead of typed commands, so it is the safest option if you are still getting used to Linux.
- Log into the Proxmox VE web interface. It usually looks like
https://your-server-ip:8006. - In the left-hand tree, click on your server's name (the node), not "Datacenter".
- Click Updates, then click Repositories.
- You will see a list of repositories. Find the one listed as enterprise and select it, then click Disable. This stops Proxmox from trying to use the paid channel.
- Click the Add button, choose No-Subscription from the list, and confirm. Proxmox will add the free repository for you automatically, with the correct settings already filled in.
- Go back to Updates and click Refresh. This runs an update check using your new repository settings.
That's it. The next time you log in, the subscription pop-up should stop appearing.
Method 2: Using the Command Line (SSH or Console)
If you prefer working in a terminal, or you are managing the server remotely without graphical access, use these steps instead. Log in as root through SSH or the console, then run the following commands.
Step 1: Disable the enterprise repository.
Recent versions of Proxmox VE store repository settings in a newer file format, called deb822, which uses the file extension .sources instead of the older .list format. Open the enterprise repository file with a text editor:
nano /etc/apt/sources.list.d/pve-enterprise.sourcesInside, you will see something similar to this:
Types: deb
URIs: https://enterprise.proxmox.com/debian/pve
Suites: trixie
Components: pve-enterprise
Signed-By: /usr/share/keyrings/proxmox-archive-keyring.gpg
Add a new line at the bottom that says Enabled: no, then save and exit (in nano, press Ctrl+O, then Enter, then Ctrl+X). This turns the repository off without deleting it, so you can easily switch back later if you ever purchase a subscription.
Step 2: Add the no-subscription repository.
Create a new file for the free repository:
nano /etc/apt/sources.list.d/proxmox.sourcesPaste in the following content:
Types: deb
URIs: http://download.proxmox.com/debian/pve
Suites: trixie
Components: pve-no-subscription
Signed-By: /usr/share/keyrings/proxmox-archive-keyring.gpg
Save and exit the same way as before.
Step 3: Update your package list.
apt updateIf everything is configured correctly, this command should finish without any authentication errors, and you will see the no-subscription repository listed in the output.
Older Proxmox VE installations that have not been reinstalled recently may still use the classicpve-enterprise.listandpve-no-subscription.listfiles instead of the newer.sourcesformat. Both formats work, the deb822 format is just the newer, more structured style that current Proxmox VE releases use by default. If your system uses the older format, the same idea applies: comment out or remove the enterprise line, and add a no-subscription line in its place.
Commands Explained
| Command or File | What It Does |
|---|---|
nano | A simple, beginner-friendly text editor built into most Linux systems. You can also use vi if you already know it. |
/etc/apt/sources.list.d/ | The folder where Debian-based systems, including Proxmox VE, store the list of software repositories they trust. |
Enabled: no | A setting inside a deb822 repository file that turns that specific repository off without deleting the file. |
Signed-By | Points to the cryptographic key file used to verify that packages from this repository are genuinely from Proxmox and have not been tampered with. |
apt update | Refreshes the local list of available packages and versions based on your currently configured repositories. It does not install anything by itself. |
Common Errors
- 401 Unauthorized during apt update: This happens when the enterprise repository is still enabled but no valid subscription key has been entered. Disabling that repository, as shown above, resolves it.
- The pop-up keeps appearing after you disabled it: Make sure you fully logged out and back into the web interface, or refresh the page with
Ctrl+F5to clear cached files. - "Could not resolve host" during apt update: This is unrelated to the subscription warning. It usually means your Proxmox host does not have working DNS or internet access. Check your network configuration first.
- Duplicate repository entries: If you run the Add button in the web interface after already manually creating the file yourself, you may end up with the no-subscription repository listed twice. This does not break anything, but it is worth cleaning up so apt does not download the same package list twice.
Troubleshooting
If apt update still fails after following the steps above, work through this checklist:
- Double-check that you saved the file after adding
Enabled: noto the enterprise repository. A common mistake is closing the editor without saving. - Confirm there are no typos in the URLs. Even a single character difference will cause the repository to fail.
- Run
cat /etc/apt/sources.list.d/pve-enterprise.sourcesto view the file and verify theEnabled: noline is really there. - Run
cat /etc/apt/sources.list.d/proxmox.sourcesto confirm the no-subscription entry was saved correctly. - Make sure your server's clock is roughly correct. Repository signature checks can fail if the system date is far off.
- If you are behind a restrictive firewall, confirm that outbound traffic to
download.proxmox.comon port 443 is allowed. - If you edited the file through a GUI-based text editor or copied text from a webpage, check for hidden formatting issues such as curly quotes or extra spaces. The deb822 format is sensitive to correct spacing after each colon.
- As a last resort, run
apt update 2>&1 | tail -n 20to view the full error output, since it usually points directly at which repository file is causing the problem.
Most of the time, the issue comes down to one of two things: the enterprise repository was not actually disabled, or there is a small typo in the URL of the file you created. Reading through the file contents carefully almost always reveals the cause.
Best Practices
- Do not delete the enterprise repository file entirely, just disable it. That way, if your organization ever purchases a subscription, re-enabling it is a one-line change.
- Only use the no-subscription repository for testing, learning, and homelab environments, not for business-critical production workloads, since it does not receive the same extended testing as the enterprise channel.
- Always take a backup or snapshot of important virtual machines before running major updates, regardless of which repository you use.
- Check the Proxmox VE release notes before applying a large version upgrade, since major upgrades (for example, moving between major Proxmox VE versions) sometimes require extra manual steps.
- Avoid using third-party "subscription remover" scripts that only hide the pop-up cosmetically without fixing the underlying repository configuration. These scripts modify Proxmox's web interface files and get overwritten during upgrades, so they need to be reapplied constantly and do not actually fix apt.
Frequently Asked Questions
Is it legal or safe to use the no-subscription repository?
Yes. It is an officially provided repository from the Proxmox project, intended for testing, evaluation, and non-production use. It is not a hack or a workaround, it is a documented, supported option.
Will I lose any features by not paying for a subscription?
No. Every feature of Proxmox VE, including clustering, backups, and virtual machine management, is available without a subscription. A subscription mainly grants access to the enterprise repository and official support tickets.
Do I need to do this again after every update?
No, this is a one-time configuration change. Your repository settings persist across normal package updates. You would only need to revisit this if you do a fresh reinstall of Proxmox VE.
What happens if I ignore the warning instead of fixing it?
The pop-up will keep appearing every time you log into the web interface, and more importantly, apt update and apt upgrade will continue to fail, meaning you will not receive security patches.
Can I switch back to the enterprise repository later?
Yes. If you purchase a subscription key in the future, you can re-enable the enterprise repository by removing the Enabled: no line, disabling the no-subscription repository, and entering your subscription key under Node, then Subscription in the web interface.
Conclusion
The "No valid subscription" message looks scary the first time you see it, but as you now know, it is simply Proxmox VE telling you that it is configured for the paid update channel. By disabling the enterprise repository and enabling the free no-subscription repository, you can update your system normally and get rid of the warning entirely.
This is one of the very first configuration steps almost every new Proxmox VE homelab and test environment goes through, so now that it is done, you are ready to move on to building your first virtual machines and containers with a fully updated system underneath them.