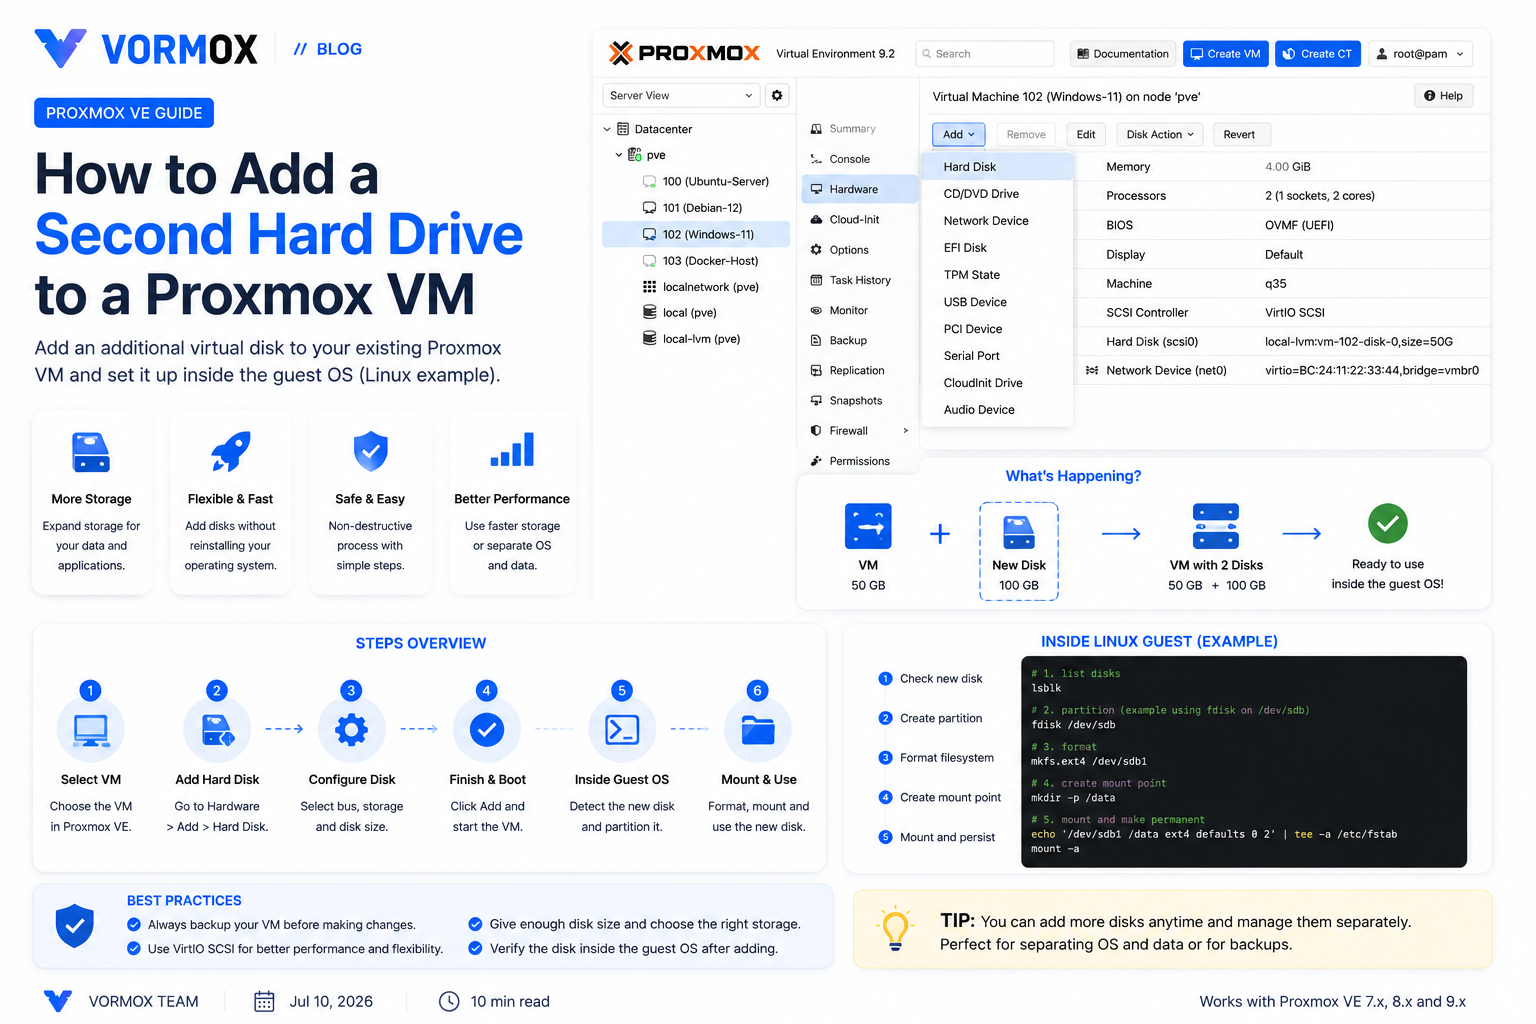
Sooner or later, every Proxmox VM runs out of room. Maybe your Nextcloud instance is choking on photo uploads, or your media server needs somewhere to actually store the media. The instinct is to just resize the existing disk, but that's not always the right move — and it's definitely not the simplest one. Most of the time, bolting on a second virtual disk is faster, safer, and easier to undo if you get something wrong.
This guide walks through adding a brand new virtual hard drive to an existing VM, from the Proxmox side all the way through partitioning and mounting it inside the guest OS. It works the same whether you're running Proxmox VE 8.x or the newer 9.x line.
What You Will Learn
You'll add a new virtual disk to a running VM's hardware, bring it online inside a Linux guest with fdisk and mkfs, and mount it somewhere permanent so it survives a reboot. We'll also cover the storage bus choice that trips up a lot of new users, and what to do if the new disk doesn't show up inside the VM at all.
- How to add a second disk through the Proxmox web GUI
- How to do the same thing with a single
qm setcommand - How to partition, format, and mount the new disk inside Linux
- How to make the mount permanent using
/etc/fstab - What to check when the new drive is invisible inside the guest
What Is This Feature?
A virtual disk in Proxmox is just a file (or a block device, if you're using ZFS or LVM-thin storage) that Proxmox presents to a VM as if it were a real, physical hard drive. The VM's operating system has no idea it's virtual — as far as Linux or Windows is concerned, it's a plain SATA, SCSI, or VirtIO drive sitting in the machine.
Adding a second one means Proxmox creates a new virtual disk image on your chosen storage (local storage, a ZFS pool, an NFS share, whatever you have configured) and attaches it to the VM on the next available bus slot. The VM sees it as a brand new, completely blank drive the moment it boots — nothing is partitioned or formatted automatically.
You'll also run into the term VirtIO while doing this. VirtIO is a set of paravirtualized drivers built specifically for virtual machines — they're faster than emulating real SATA hardware because the guest OS talks to Proxmox almost directly instead of pretending to be real hardware the whole way through. For disks, that means noticeably better throughput, especially under load.
Why Would You Use It?
There are a few good reasons to reach for a second disk instead of resizing your existing one:
- Separation of OS and data. Keeping your operating system on one disk and your actual data (media files, databases, container volumes) on another means you can snapshot, back up, or resize each independently.
- Different storage backends per disk. You might want your OS disk on fast local SSD storage but your bulk data disk on a slower, larger ZFS pool or NFS share. That's only possible with separate disks.
- Safer than growing an existing partition. Resizing a root filesystem while it's live is doable but fiddly, especially with LVM layouts. Adding a fresh disk and mounting it at a new path avoids touching anything that already works.
- Easier snapshots for large data sets. If your data disk is enormous and rarely changes, you can skip including it in frequent snapshots and only back it up separately, saving a lot of time and storage.
I'll be honest — if you're just testing something for an hour, none of this matters. But for anything you plan to keep running, separating OS from data on day one saves you a much messier migration six months later.
Prerequisites
- An existing VM in Proxmox VE 8.x or 9.x, either running or stopped.
- At least one configured storage location in Proxmox with free space (check Datacenter → Storage).
- SSH or console access to the guest OS to partition and mount the new disk.
- Root or sudo access inside the guest.
This guide assumes a Linux guest for the partitioning steps. If you're running Windows, the Proxmox-side steps are identical — only the in-guest formatting (Disk Management instead of fdisk) differs.
Step-by-Step Tutorial
Step 1: Add the Disk Through the GUI
Select your VM in the Proxmox tree, click Hardware, then Add → Hard Disk near the top of the panel. A dialog opens where you'll set a few things:
- Bus/Device: pick SCSI or VirtIO Block. SCSI with the VirtIO SCSI controller is the safer default for most Linux guests today; VirtIO Block is a little faster but less flexible for hotplugging later.
- Storage: choose which storage location the new disk file will live on.
- Disk size (GiB): how big you want the new drive to be. You can grow it later, but shrinking is far more painful, so don't undersize it too aggressively.
Click Add. The disk now exists in the VM's configuration but is not yet active if the VM is running — for a brand new disk that's fine, there's nothing to lose by rebooting.
Step 2: Add the Disk Through the CLI (Alternative)
If you'd rather skip the GUI, SSH into the Proxmox host and run:
qm set 100 --scsi1 local-lvm:32Here, 100 is the VM ID, scsi1 is the next free SCSI slot (scsi0 is usually your existing boot disk), local-lvm is the storage ID, and 32 is the size in GiB. Swap all four for your own values — check your existing storage names first with:
pvesm statusStep 3: Restart or Rescan the VM
If the VM was already running when you added the disk, restart it so the guest OS picks up the new hardware:
qm shutdown 100
qm start 100
Some Linux kernels can detect a hot-added SCSI disk without a reboot using a manual bus rescan, but honestly it's rarely worth the hassle for a one-time disk addition — just restart the VM.
Step 4: Confirm the New Disk Is Visible
SSH into the guest and list the block devices:
lsblkYou should see a new, unpartitioned device — typically something like sdb if you're on SCSI, or vdb if you used VirtIO Block. It'll show a size matching what you set in Proxmox and no filesystem type next to it, since it's completely blank.
Step 5: Partition the Disk
Use fdisk to create a partition on the new drive. Replace sdb with whatever device name you saw in lsblk:
sudo fdisk /dev/sdbInside the interactive prompt, type n for a new partition, accept the defaults for partition type and size (press Enter through each prompt to use the whole disk), then type w to write the changes and exit.
Step 6: Format the New Partition
Create a filesystem on the partition you just made — ext4 is the safe, well-tested default for most Linux setups:
sudo mkfs.ext4 /dev/sdb1Note the 1 at the end — you're formatting the partition, not the raw disk.
Step 7: Mount the New Disk
Create a folder to mount it to, then mount it there:
sudo mkdir /mnt/data
sudo mount /dev/sdb1 /mnt/data
Run df -h to confirm the new disk shows up with the correct size at /mnt/data.
Step 8: Make the Mount Permanent
A manual mount disappears on reboot unless you add it to /etc/fstab. First, get the partition's UUID, which is more reliable than the device name (device names like /dev/sdb1 can shift if you add more disks later):
sudo blkid /dev/sdb1Copy the UUID value, then edit /etc/fstab and add a line like this at the bottom:
UUID=your-uuid-here /mnt/data ext4 defaults 0 2Save the file and test it without rebooting by running sudo mount -a. If that command runs with no errors, your fstab entry is correct.
Commands Explained
| Command | What It Does |
|---|---|
qm set 100 --scsi1 local-lvm:32 |
Creates a new 32 GiB virtual disk on the local-lvm storage and attaches it to VM 100 as the second SCSI device. |
pvesm status |
Lists all storage locations configured on the Proxmox host, along with how much space is available on each. |
lsblk |
Lists every block storage device the guest OS currently sees, including size and partition layout. |
fdisk /dev/sdb |
Opens an interactive partitioning tool for the specified disk, used here to create a single new partition. |
mkfs.ext4 /dev/sdb1 |
Formats the given partition with the ext4 filesystem, making it usable for storing files. |
mount /dev/sdb1 /mnt/data |
Attaches the formatted partition to the specified folder so its contents become accessible. |
blkid /dev/sdb1 |
Prints the partition's UUID and filesystem type, needed for a stable fstab entry. |
mount -a |
Mounts everything listed in /etc/fstab, used to verify a new entry works before rebooting. |
Common Errors
"cannot open /dev/sdb: No such file or directory" — The disk hasn't shown up in the guest yet. Almost always this means the VM needs a restart, or the disk was added but never actually attached (double-check the Hardware tab in Proxmox to confirm it's listed).
"mount: /mnt/data: wrong fs type, bad option, bad superblock" — Usually means you tried to mount the raw disk (/dev/sdb) instead of the partition (/dev/sdb1), or the formatting step was skipped entirely.
fstab entry causes the VM to fail to boot — A typo in a UUID or a missing mount point directory will make systemd hang at boot waiting for that filesystem. If this happens, boot into rescue mode or use the Proxmox console to comment out the bad line with a # at the start, then fix it.
Troubleshooting
If lsblk doesn't show your new disk at all after restarting the VM, go back to the Proxmox Hardware tab and confirm the disk is actually attached and not just sitting in an "unused" state — sometimes a disk gets detached during a failed attempt and needs to be reattached manually by double-clicking it and choosing Add.
If the VM won't boot after you edited /etc/fstab, the nofail option is worth adding to that line (UUID=... /mnt/data ext4 defaults,nofail 0 2) — it tells the system to boot normally even if that particular filesystem can't be mounted, rather than hanging indefinitely.
For Windows guests, if the new disk doesn't appear in File Explorer, open Disk Management (right-click the Start button → Disk Management). New disks show up there as "Not Initialized" — right-click and initialize the disk, then create a new simple volume through the wizard.
Best Practices
- Use VirtIO SCSI as your controller type for new VMs — it's the best balance of performance and compatibility for most setups today.
- Give data disks descriptive mount points like
/mnt/dataor/mnt/mediarather than burying them under generic names. - Always use UUIDs in
/etc/fstab, not raw device names — device letters can shift around if you add or remove disks later. - Size disks a bit larger than you think you need. Growing a Proxmox virtual disk later is simple; shrinking one is not.
- Snapshot the VM before you touch partitioning commands for the first time, in case something goes sideways.
Frequently Asked Questions
Can I add a disk to a VM without shutting it down?
Yes, Proxmox supports hotplugging disks on most guests. The disk will attach live, though some older or minimal guest kernels still need a reboot to actually see it.
Which is better, SCSI or VirtIO Block?
VirtIO SCSI is the more common recommendation — it supports more features like TRIM and hotplug, and performs nearly as well as VirtIO Block for most workloads.
Do I need a separate disk, or can I just resize my existing one?
Either works. A separate disk is simpler and safer if you want clean separation between OS and data; resizing is better if you just need more room in the same filesystem.
What filesystem should I use besides ext4?
XFS is a solid alternative, especially for large data volumes. Avoid picking something exotic unless you have a specific reason — ext4 and XFS cover almost every homelab use case.
Will adding a disk affect my existing backups?
Yes, Proxmox backups include every attached disk by default, so your backup size and time will increase. You can exclude specific disks from backup jobs if needed under the VM's backup settings.
Conclusion
Adding a second disk to a Proxmox VM is one of those tasks that sounds intimidating the first time and takes about ten minutes once you've done it. The Proxmox side is a couple of clicks or one command; the guest side is standard Linux disk management that's been the same for decades.
Once you've got the habit of separating OS and data disks, you'll wonder why you ever crammed everything onto one giant virtual drive in the first place.