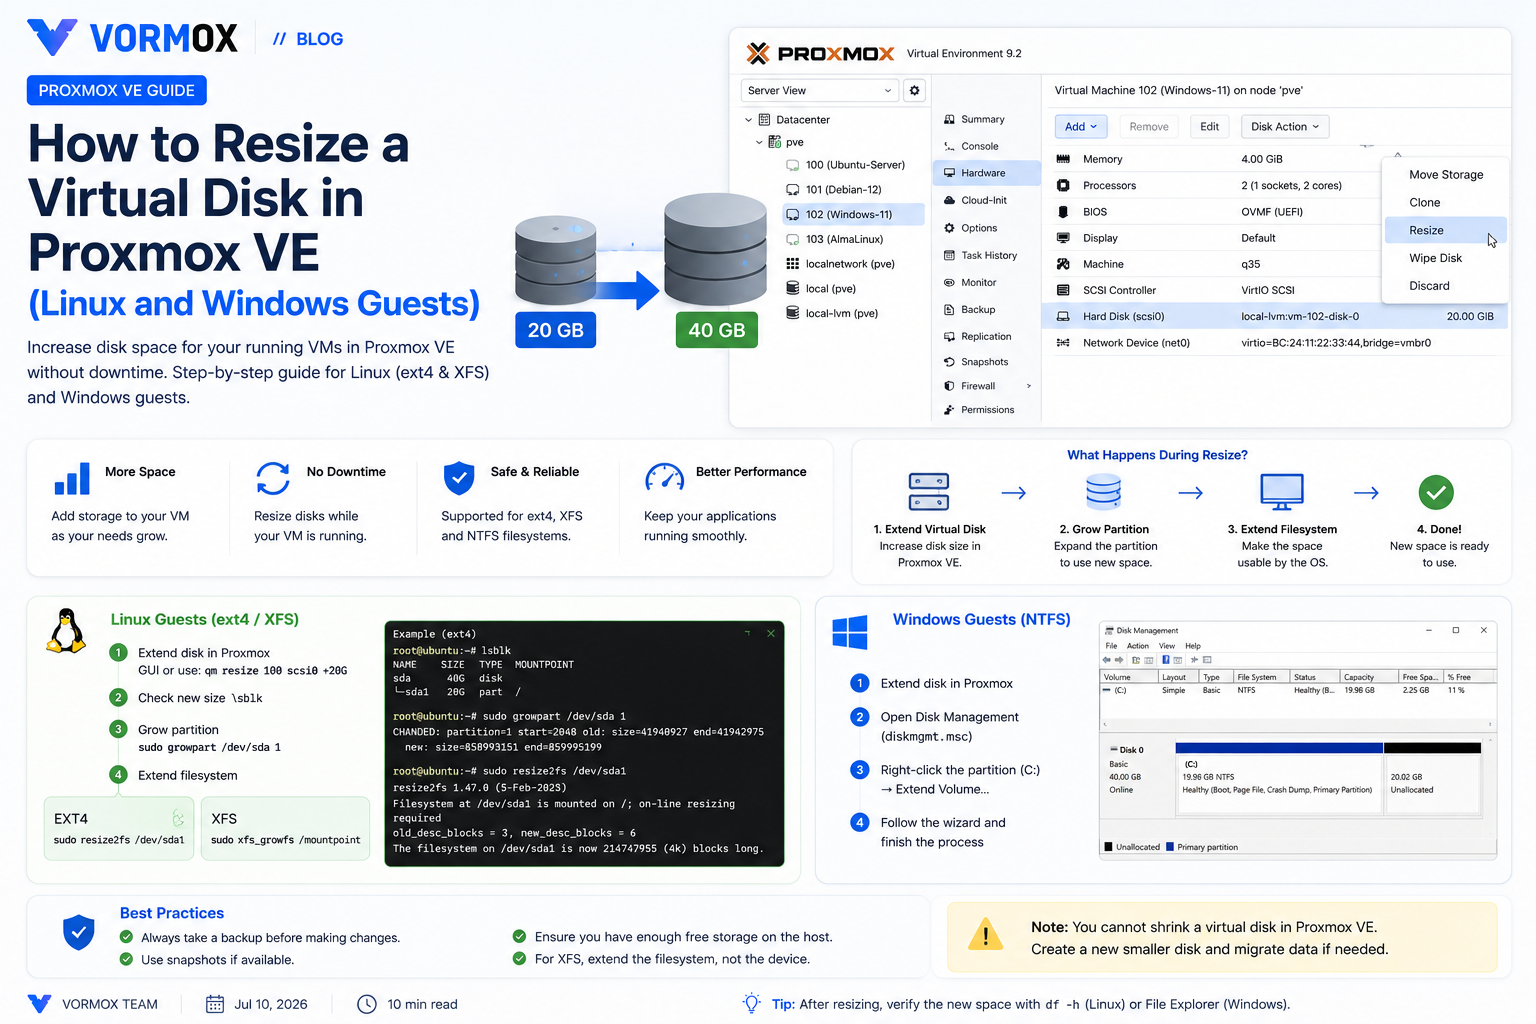
Every homelab has this moment. You built a VM with a 20 GB disk because that seemed like plenty at the time, and eight months later df -h shows 2 GB free and Nextcloud has stopped accepting uploads. You don't want to rebuild the whole VM — you just want more space.
Good news: Proxmox can grow a virtual disk while the VM is still running, no downtime, no reinstall. The part that trips people up isn't the Proxmox side — it's the second half of the job, inside the guest OS, where a lot of tutorials just wave their hands and say "then extend the filesystem" without explaining how.
This guide covers both halves properly: growing the disk in Proxmox, then actually making that space usable inside a Linux or Windows guest.
What You Will Learn
- What a virtual disk actually is and why resizing it is a two-step process, not one
- How to grow a disk from the Proxmox GUI and from the command line
- How to extend the partition and filesystem inside a Linux guest (ext4 and XFS)
- How to extend a volume inside a Windows guest using Disk Management
- Why Proxmox won't let you shrink a disk, and what your actual options are if you overshot
- The mistakes that leave people with "extra space that doesn't show up anywhere"
What Is This Feature?
A virtual disk in Proxmox is a file (or a block device, depending on your storage type) that acts as the hard drive for a VM. When you create a 20 GB disk, Proxmox reserves — or in the case of thin-provisioned storage, tracks the ceiling for — 20 GB and presents it to the guest OS as a raw drive, exactly like a physical SATA or NVMe disk would look to a real computer.
Resizing that disk means telling Proxmox "make this drive bigger." But here's the thing people miss: growing the virtual disk only changes how big the drive looks from the outside. It doesn't touch the partition table or the filesystem sitting on top of it. Those are the guest operating system's job, not Proxmox's.
It's the same as if you swapped a laptop's 250 GB SSD for a 1 TB one. The bigger drive is there, but Windows or Linux still thinks the partition ends where the old drive did, until you go into Disk Management or a partitioning tool and tell it to use the rest.
Why Would You Use It?
The obvious case is running out of space, but there are a couple of other reasons people reach for this:
- You're standardizing on a small "template" disk size for fast cloning, then growing individual VMs as their workloads need it.
- A service you're running — a database, a media library, a backup target — grew faster than you planned for.
- You provisioned generously at first (say, 100 GB) but the guest's filesystem was created smaller during OS install, and you need to catch the filesystem up to the disk that's already there.
Whatever the reason, doing it live beats the alternative of shutting the VM down, attaching a bigger disk, and migrating everything over by hand.
Prerequisites
- A Proxmox VE host, version 7.x through 9.x — the resize workflow is identical across these
- An existing VM with a virtual disk attached (this doesn't apply to CD/DVD drives, obviously)
- Enough free space on the underlying Proxmox storage to accommodate the larger disk
- Console or SSH access to the guest OS, since half of this happens inside the VM
- A recent backup — not strictly required, but growing a disk is about as safe as Proxmox operations get, and it's still good practice before touching disk layout
Step-by-Step Tutorial
Step 1: Grow the disk from the Proxmox GUI
Select your VM in the left-hand tree, click Hardware, and click on the disk you want to grow (for example scsi0 or virtio0).
Click Disk Action at the top of the panel, then choose Resize. A dialog box opens asking how much space to add. Type in the amount, like 20 for 20 GB, and click Resize disk.
Note that this field adds to the current size — it's not the new total. If your disk is currently 20 GB and you want it to end up at 40 GB, you type 20, not 40.
You can do this while the VM is running. No reboot needed for this step, and no downtime for most storage backends.
Step 2: Or grow it from the command line
If you're SSH'd into the Proxmox host anyway, this is faster:
qm resize 100 scsi0 +20GReplace 100 with your VM ID and scsi0 with the actual disk identifier — check Hardware in the GUI if you're not sure which one you're growing. The +20G adds 20 gigabytes to the current size. Leave off the + and it sets an absolute size instead — qm resize 100 scsi0 60G sets the disk to exactly 60 GB regardless of what it was before.
Step 3: Extend the partition inside a Linux guest
Log into the guest and confirm the kernel sees the new disk size:
lsblkYou should see the larger total next to your disk (like /dev/sda), but the partition underneath it (/dev/sda1) will still show the old, smaller size. That gap is the unallocated space you just added.
The easiest way to close that gap is growpart, from the cloud-guest-utils package. Install it if it's not already there:
apt update
apt install -y cloud-guest-utils
Then grow the partition — this example extends partition 1 on /dev/sda:
growpart /dev/sda 1That resizes the partition to fill the new space, but the filesystem inside it still hasn't changed. For ext4 (the default on Debian and Ubuntu), run:
resize2fs /dev/sda1If you're on XFS instead (common on RHEL/Rocky/Alma installs), the command is different because XFS can only grow while mounted, and it grows the whole filesystem rather than targeting a raw partition:
xfs_growfs /Run df -h afterward and you should see the extra space reflected immediately.
Step 4: Extend a volume inside a Windows guest
Windows makes this part easier. Log into the VM, right-click the Start button, and choose Disk Management.
Find the disk you resized — it should show a block of Unallocated space after the existing partition. Right-click the partition you want to grow (typically C:) and choose Extend Volume. Follow the wizard, accept the default of using all the unallocated space, and click Finish. No reboot required.
If Extend Volume is greyed out, it usually means the unallocated space isn't directly adjacent to the partition you're trying to grow, which can happen if there's a recovery partition or another volume sitting between them. That's a Windows partitioning quirk, not a Proxmox problem.
Commands Explained
| Command | What it does |
|---|---|
qm resize 100 scsi0 +20G | Adds 20 GB to disk scsi0 on VM 100, on top of whatever size it already is. |
qm resize 100 scsi0 60G | Sets disk scsi0 on VM 100 to an absolute size of 60 GB, regardless of its previous size. |
lsblk | Lists block devices and their sizes so you can confirm the guest kernel sees the new disk size. |
growpart /dev/sda 1 | Expands partition 1 on disk /dev/sda to consume newly available unallocated space. |
resize2fs /dev/sda1 | Grows an ext4 filesystem to fill its partition after the partition itself has been extended. |
xfs_growfs / | Grows an XFS filesystem mounted at the given path to use all available space in its partition. |
Common Errors
"resize2fs: Bad magic number in super-block." This almost always means you pointed resize2fs at the wrong device — often the raw disk (/dev/sda) instead of the partition (/dev/sda1). Double-check with lsblk before running it.
Disk size increased in Proxmox but the guest still shows the old size. The guest often needs a manual rescan. On Linux, re-running lsblk after a moment usually picks it up; if not, a reboot of the VM will force it. On Windows, closing and reopening Disk Management is usually enough.
"Shrinking disk size is not supported" when trying to reduce a disk. This isn't a bug — Proxmox genuinely doesn't allow shrinking through the resize dialog or qm resize. If you truly need a smaller disk, you're looking at creating a new smaller disk and migrating data over manually, not a one-command fix.
Extend Volume is greyed out in Windows Disk Management. Usually caused by another partition sitting between your target partition and the unallocated space — commonly a recovery partition on the far end of the disk.
Troubleshooting
If you've resized the disk in Proxmox but the extra space still isn't usable inside the guest, work through this in order:
- Confirm Proxmox actually applied the resize. Run
qm config 100on the host and check the size listed next to the disk entry. - Confirm the guest kernel sees the change. On Linux,
lsblk; on Windows, Disk Management. If the guest doesn't see it at all, try a reboot before troubleshooting further. - Confirm the partition was extended, not just the disk. This is the step people skip.
lsblkshows both the disk and partition sizes on separate lines — they need to match (or be close) once you're done. - Confirm the filesystem was extended, not just the partition. This is the other step people skip.
df -hshows what's actually usable. Iflsblkshows the partition is big butdf -hstill shows the old size, you forgotresize2fsorxfs_growfs.
Ninety percent of "I resized the disk but nothing changed" reports come down to stopping after step 1 or step 2 and never running the filesystem-level command. Proxmox did its job; the guest just hasn't caught up yet.
Best Practices
Grow disks in smaller, more frequent increments rather than guessing a huge number up front. Since shrinking isn't supported, oversizing a disk means that space is effectively locked in — you can always add more later, but you can't easily take it back.
Take a snapshot or backup before resizing anything that matters, even though disk growth itself is low-risk. It costs you two minutes and saves you a bad day if something else goes wrong during the same maintenance window.
If you manage a lot of similar VMs, consider using a smaller base disk in your template and growing individual clones as needed, rather than provisioning every VM at the largest size you might ever need. Thin-provisioned storage (where the backend only actually uses space as data is written, rather than reserving the full size upfront) makes this especially worthwhile.
Frequently Asked Questions
Can I resize a disk while the VM is running?
Yes, for most storage backends. The Proxmox-side resize itself doesn't require downtime. The guest OS may still need a rescan or reboot to fully recognize the change.
Can I shrink a disk in Proxmox?
No. Both the GUI and qm resize only support growing a disk. Shrinking requires creating a new, smaller disk and migrating the data manually.
Will resizing the disk delete my data?
No. Growing a disk only adds unallocated space at the end — it doesn't touch existing data. That said, always keep backups current before any storage change as general practice.
Does this work the same for LXC containers?
Containers use a similar pct resize command instead of qm resize, and since containers share the host's kernel, the filesystem often adjusts automatically without the manual growpart/resize2fs steps a VM needs.
Why does my disk show more space in Proxmox but not in the guest?
Because resizing the virtual disk and resizing the filesystem inside it are two separate operations. See the Troubleshooting section — you almost certainly need to extend the partition and filesystem inside the guest.
Conclusion
Growing a virtual disk in Proxmox takes about thirty seconds. Making that space actually usable inside the guest is the part worth understanding properly, since it's a different step for Linux (growpart plus resize2fs or xfs_growfs) than for Windows (Disk Management's Extend Volume).
Once you've done it once, it's a five-minute job start to finish. And now that you know disks can only grow, not shrink, it's worth erring a little conservative the next time you're sizing a fresh VM — you can always come back and add more later.